
Stepping out of bed in the morning or walking across a room should never feel like driving a rusty spike directly into your heel. Yet for anyone suffering from calcaneal spurs, that sharp, searing jolt with every single stride is an exhausting reality. When daily tasks, work commutes, and simple errands become an exercise in agony, waiting weeks for a specialized clinical appointment is simply not practical. You need reliable, actionable, and immediate home steps to relieve painful heel spurs while walking so you can regain mobility, minimize structural trauma, and move through your day without dreading every single step.
What Actually Causes Heel Spur Pain When You Walk?
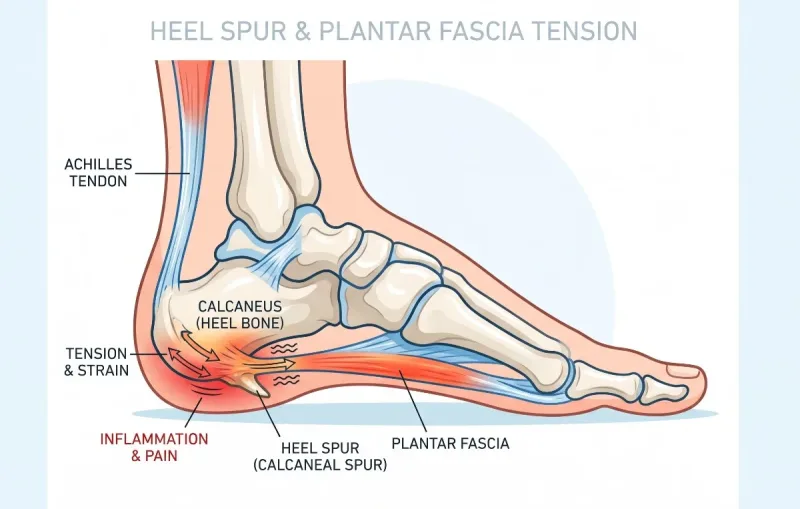
To solve the pain, you have to understand the mechanics beneath your skin. A calcaneal spur is an osteophyte—a localized, bony projection that gradually forms on the underside of the heel bone (calcaneus). These spurs develop over months of repetitive biomechanical traction: when the connective tissues surrounding the heel are pulled continuously, the body attempts to reinforce the site by depositing calcium salts. Over time, that calcification solidifies into a spur.
However, a critical clinical reality often surprises patients: the bone protrusion itself is rarely what causes the sharp pain.
The bone spur is situated horizontally beneath the soft tissue, pointing forward along the natural path of the plantar fascia—a dense, fibrous aponeurosis extending from the heel pad to the metatarsal heads at the base of your toes. The agonizing ache during weight-bearing movement is caused by:
-
Micro-Tearing and Fasciitis: Tensile tension pulls violently at the periosteum (the membrane covering the bone), causing micro-tears and chronic inflammation at the enthesis.
-
Heel Fat Pad Compression: The subcalcaneal fat pad—your foot’s built-in hydraulic shock absorber—often becomes thinned or inflamed, allowing vertical ground forces to directly irritate sensitive, highly innervated periosteal tissue.
-
Tensile Pull During Mid-Stance: When walking, your arch naturally collapses slightly to absorb impact, placing peak tension directly onto the spur's attachment point.
By addressing the tension in the plantar fascia, stabilizing the arch, and dampening vertical heel strikes, you can neutralize this pain rapidly from home.
7 Immediate Home Steps to Relieve Painful Heel Spurs While Walking
These evidence-backed, conservative interventions focus on mechanical offloading, myofascial release, and acute inflammation control to give you functional relief right away.
1. Perform Pre-Step Fascial Mobilization (The "No Cold Steps" Rule)
The most common mistake people make is taking weight-bearing steps immediately after resting. During sleep or prolonged sitting, damaged soft tissues contract and cool into a shortened state. When you stand up without preparation, your body weight violently stretches these tightened fibers, tearing delicate healing tissues and triggering sharp pain.
-
The Technique: Before swinging your legs out of bed or standing from your desk, cross the affected foot over your opposite thigh.
-
The Stretch: Grasp the base of all five toes with your hand and gently pull them backward toward your shin until you feel a firm, distinct stretch through the bottom of your arch. Hold this position steadily for 20 seconds.
-
Active Cross-Friction: While maintaining tension on the toes, use the thumb of your opposite hand to apply firm, transverse massage strokes along the medial arch band, starting from the mid-foot and working backward toward the front edge of the heel.
-
Dosing: Complete 3 rounds of 20-second holds prior to taking your first step. This restores elasticity to the collagen matrix and prevents the abrupt mechanical shock that causes limping.
2. Implement Low-Dye Biomechanical Arch Taping
If you must walk or stand for work, taping your foot provides an instant external scaffold. Proper low-dye taping limits excessive calcaneal eversion (inward rolling) and prevents the longitudinal arch from flattening fully, transferring mechanical tension away from the painful heel insertion.
-
Materials: Rigid zinc-oxide athletic strapping tape or specialized kinesiology tape (2 inches wide).
-
Application:
-
Sit with your ankle held at a strict 90-degree angle.
-
Anchor a base strip across the top of the foot just behind the metatarsal heads.
-
Run an arch-support strip from the outside base of the little toe, wrapping snugly around the back of the heel, under the medial arch, and anchoring back to the ball of the big toe.
-
Apply upward tension on the medial arch strip before smoothing it down to physically hoist the arch structure.
-
Apply 2 to 3 interlocking strips under the midfoot to create a supportive sling.
-
-
Result: You will feel an immediate reduction in the pulling sensation beneath the heel the moment your foot strikes the ground.
3. Deploy Frozen Cylinder Cryo-Rolling
Applying an ice pack to the bottom of the foot is a common strategy, but static ice packs only numb superficial tissue. Rolling your foot over a frozen cylinder combines two targeted therapies: cryotherapy (which constricts swollen capillaries and slows down pain nerve conduction) and deep myofascial release.
-
Preparation: Fill a 500 ml contoured plastic water bottle three-quarters full and place it in the freezer horizontally until completely solid.
-
Execution: Sit upright in a supportive chair (never stand during this exercise, as standing forces too much weight directly onto the spur). Place the frozen bottle beneath your arch.
-
Movement: Apply moderate downward force and roll the bottle back and forth from the ball of your foot to the anterior boundary of your heel.
-
Crucial Rule: Avoid rolling directly onto the hard, bony protrusion of the heel itself; target the fleshy arch area right in front of the spur.
-
Duration: Roll for 8 to 10 minutes at a time, up to 3 times per day—especially immediately following sustained walking.
4. Switch to High-Torsional, Zero-Drop-Forbidden Indoor Footwear
Walking barefoot on hardwood, tile, linoleum, or concrete flooring strips away your natural shock protection. Without a supportive shoe, the ground reaction force pushes directly into the calcaneus with zero dampening.
-
The Indoor Rule: Establish a strict policy of never walking barefoot, even for brief trips to the bathroom at night.
-
What to Look For: Keep structured recovery slides, orthotic clogs, or indoor-dedicated walking shoes right beside your bed.
-
Key Specifications:
-
Heel-to-Toe Drop: Look for a shoe with an 8 to 12 mm heel elevation. Raising the heel slightly slackens the Achilles tendon and relieves tensile stress on the plantar fascia.
-
Torsional Rigidity: Grasp the shoe at the toe and heel, then twist. If it twists like a wet towel, it will not protect your spur. It must be rigid through the midfoot.
-
Rocker-Bottom Sole: Footwear with a slight curve along the bottom helps roll your body weight through the push-off phase without requiring your arch to bend excessively.
-
5. Utilize Dual-Density Silicone Heel Cups
If your work requires specific footwear that lacks sufficient built-in cushioning, dual-density silicone heel cradles are an effective, low-cost offloading solution.
-
How They Function: High-grade silicone heel cups work by wrapping around the outer edges of the heel, preventing the heel's natural fat pad from splaying outward under your body weight. This keeps your natural cushioning directly underneath the bone.
-
Targeted Soft Spot: Look for heel cups featuring an "island" or central insert made of softer, lower-durometer silicone located directly beneath the spur site, surrounded by a firmer outer perimeter.
-
Balance Both Sides: Always place heel cups in both shoes, even if only one foot hurts. Treating only one foot creates an artificial leg-length discrepancy that can trigger compensatory knee, hip, and lower back dysfunction within days.
6. Perform the Eccentric Gastroc-Soleus Wall Stretch
The Achilles tendon connects directly to the calcaneus, and its fibers blend seamlessly with the plantar fascia underneath the foot. When your calf muscles (the superficial gastrocnemius and deep soleus) are tight, they hold the heel bone in constant upward tension, multiplying the strain placed on the spur during walking.
-
Step 1 (Upper Calf): Stand facing a sturdy wall at arm's length. Step your affected leg straight back, keeping your heel pinned flat to the floor and your toes pointed straight forward. Bend your front knee and lean toward the wall until you feel a firm, comfortable stretch in the upper half of your calf. Hold for 30 seconds.
-
Step 2 (Deep Soleus & Achilles): From that exact position, bend your back knee slightly while keeping the heel glued to the floor. You will feel the stretch descend deep into your lower calf and the back of your heel. Hold for 30 seconds.
-
Frequency: Complete 3 repetitions of both stretches, 3 times daily. Increasing ankle dorsiflexion stops the foot from over-pronating and dragging the spur across hard flooring.
7. Wear a Dorsal Night Splint to Lock Resting Length
When you fall asleep under heavy blankets, your feet naturally point downward into plantar flexion. In this position, the plantar fascia rests in its shortest possible state, allowing inflammatory repair tissue to knit together tightly overnight. The tearing of this tightened tissue during your first morning steps resets your recovery clock every single day.
-
A low-profile dorsal night splint or tension sock mechanically holds the foot at a neutral 90-degree angle while you sleep.
-
By holding the tissue at a functional resting length for 6 to 8 hours, micro-tears heal in an elongated, pliable orientation.
-
This dramatically reduces that classic morning pain spike, allowing you to walk normally right away.
Mechanical Offloading vs. Active Tissue Recovery
Understanding how each home intervention functions helps you choose the right combination for your daily routine:
| Home Intervention | Onset of Action | Primary Physiological Mechanism | Best Used For |
| Pre-Step Mobilization | Immediate (3 mins) | Aligns collagen fibers; removes resting stiffness | Immediately before getting out of bed/chair |
| Frozen Bottle Rolling | 10 minutes | Cryo-vasoconstriction + fascial massage | Acute flare-ups after work or long walks |
| Low-Dye Arch Taping | Instant upon walking | Externally distributes weight across the midfoot | Days requiring extensive standing or steps |
| Silicone Heel Cups | Instant in shoes | Concentrates the heel fat pad; dampens impact | Everyday wear inside work and walking shoes |
| Calf Wall Stretches | 3 to 7 days | Increases ankle dorsiflexion; stops over-pronation | Morning, midday, and evening maintenance |
| Dorsal Night Splint | 1 to 2 weeks | Prevents overnight shortening of healing tissue | Overnight use during high-pain cycles |
4 Frequent Mistakes That Aggravate Heel Spur Pain
When walking is excruciating, people often adopt intuitive coping habits that worsen the underlying tissue inflammation:
-
Walking on Your Toes or Outer Foot Edges: Altering your gait to spare the heel transfers heavy, abnormal loads to your metatarsal bones and lateral tendons. This frequently causes secondary complications like peroneal tendonitis, metatarsalgia, and knee pain.
-
Aggressive Direct Pounding on the Spur: Striking, hammering, or using a hard massage gun directly on the painful bony spot of the heel bone can bruise the calcaneal periosteum and burst subcalcaneal bursae, drastically increasing inflammation.
-
Using Flat, Worn-Out Shoes: Walking in worn-out sneakers or thin, unsupportive flat shoes forces your foot to absorb all ground reaction forces unassisted, placing peak tension on the spur.
-
Absolute Bed Rest: Completely immobilizing your foot for days leads to stiff, deconditioned tissue that hurts even more upon your return to walking. Gentle, protected movement with proper footwear supports circulation and healthy tissue remodeling.
A Daily Morning-to-Evening Step-Relief Routine
To stay consistent, follow this daily routine designed to keep your heels supported from morning to night:
-
Morning (Before Feet Touch the Floor):
-
Complete 15 clockwise and counterclockwise ankle circles.
-
Perform 3 sets of 20-second toe-extension stretches with manual arch friction.
-
Step directly out of bed into supportive, cushioned recovery footwear (no barefoot steps).
-
-
Midday (During Work or Travel):
-
Keep low-dye athletic tape or dual-density silicone cups inside your walking footwear.
-
Take 2-minute movement breaks during prolonged sitting to stretch your calves against a wall or step.
-
-
Evening (Post-Activity Recovery):
-
Perform 10 minutes of seated frozen bottle cryo-rolling under the arch.
-
Complete your standing gastrocnemius and soleus wall stretches.
-
Fasten your dorsal night splint before going to sleep to preserve tissue length overnight.
-
Medical Disclaimer:The material presented in this article is provided strictly for educational and informational purposes and does not constitute medical advice, diagnosis, or clinical treatment plans. Heel pain can mimic various underlying conditions, including systemic inflammatory arthritis, retrocalcaneal bursitis, stress fractures, and peripheral nerve entrapment. Always consult a licensed podiatrist, orthopedic physician, or certified physical therapist before initiating any new conservative therapy, exercise routine, or mechanical offloading protocol. Never ignore professional clinical advice or delay seeking evaluation based on information read online.




Comments
No comments yet. Be the first to ask a question or share an update.
Leave a comment
Your mobile number is never published. Comments appear after review. Website links, email addresses and code are not allowed.