
Prolonged desk sitting is one of the most common drivers of lower back tightness, postural fatigue, and chronic lumbar ache. When you sit for hours at a computer, your hip flexors shorten, the gluteal muscles become inactive, and the natural lordotic curve of your lumbar spine flattens under passive loading.
Incorporating safe seated stretches to relieve lower back pain at your desk allows you to decompress spinal discs, restore hip mobility, and activate stagnant core stabilizers without ever needing to leave your chair or disrupt your workflow.
Below is an evidence-based, ergonomic stretching sequence designed to release lumbar tension safely, followed by posture fundamentals and practical answers to common questions.
Why Desk Sitting Provokes Lower Back Pain
To fix lower back pain at your desk, it helps to understand what happens biomechanically when you remain seated in a chair:
-
Increased Disc Pressure: Sitting upright with poor posture exerts up to 40% to 90% more hydrostatic pressure on the lumbar intervertebral discs (specifically L4–L5 and L5–S1) compared to standing upright.
-
Adaptive Hip Flexor Shortening: The psoas major and iliacus muscles connect your lower spine to your upper thigh bone. In a seated position, these muscles remain in a constantly shortened state. When tight, they pull directly on the lumbar vertebrae, creating excessive anterior shear force.
-
Gluteal Inactivation: Sitting exerts sustained compressive pressure on the gluteus maximus and medius, dampening neuromuscular recruitment—often referred to as sensory motor amnesia or "glute amnesia." Without the glutes actively supporting pelvis stability, the lumbar erectors are forced to work overtime to keep you upright.
-
Thoracic Rigidity: Slouching over a keyboard locks the mid-back (thoracic spine) into kyphosis. When the thoracic spine loses rotational and extension mobility, the lower back compensates by moving excessively, leading to microtrauma and strain.
Core Safety Rules Before You Begin
Before starting any desk stretching routine, keep these three safety guidelines in mind:
-
Work in a Pain-Free Range: A healthy stretch feels like gentle, pleasant tension or mild warmth in the muscle belly. If you feel sharp, pinching, electric, or shooting sensations, stop immediately.
-
Maintain a Neutral Spine Baseline: Avoid aggressively yanking your head, neck, or lower back. Initiate movements from the pelvis and breath.
-
Never Bounce (Avoid Ballistic Stretching): Move into each posture gradually and hold statically with slow, deep nasal breathing. Bouncing triggers the muscle spindle reflex, causing the muscle to contract protectively rather than relax.
6 Safe Seated Stretches to Relieve Lower Back Pain at Your Desk
Perform this sequence in order, or pick 2 to 3 stretches to perform every 60 to 90 minutes throughout the workday.
1. Seated Pelvic Tilts (Lumbar Mobilizer)
Target: Restores micro-movement to the sacroiliac (SI) joints and lower lumbar discs without excessive spine flexion.
-
How to Perform:
-
Place your hands on your hips or rest them gently on your thighs.
-
Inhale deeply, gently arch your lower back, rolling your pelvis forward so your tailbone points slightly backward and your chest lifts (anterior pelvic tilt).
-
Exhale slowly through your nose, tuck your tailbone underneath you, and gently round your lower back, flattening the lumbar curve (posterior pelvic tilt).
-
Perform 8 to 10 fluid, slow repetitions synchronized with your breath.
-
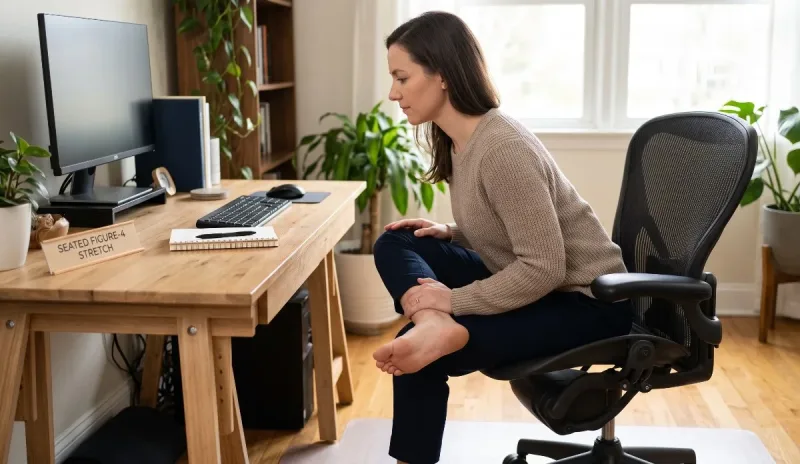
2. Seated Figure-4 Piriformis Stretch
Target: Releases the deep hip rotators and piriformis, which directly relieve compression off the sciatic nerve.
-
How to Perform:
-
Lift your right leg and rest your right ankle across your left knee, creating the shape of the number "4."
-
Keep your right foot actively flexed (toes pulled toward your shin) to protect the right knee joint.
-
Sit as tall as possible through your crown, lengthening your spine.
-
Without rounding your upper back, hinge forward from the hips with a flat spine until you feel a deep, satisfying stretch in the outer right glute and hip.
-
Hold for 30 seconds while breathing deeply. Return to upright and switch to the left side.
-
3. Gentle Seated Torso Twist (Thoracic Decompressor)
Target: Restores mid-back rotation so the lower back does not overcompensate during everyday movements.
-
How to Perform:
-
Sit tall and lengthen your spine upward toward the ceiling.
-
Place your right hand on the outside of your left thigh or on the left armrest. Rest your left hand behind you on the seat base.
-
Inhale to find vertical length; as you exhale, gently rotate your ribcage to the left.
-
Keep your hips and knees pinned facing straight forward—do not allow the hips to shift or slide on the seat. The rotation should come from your middle back, not your lumbar spine.
-
Hold for 20 to 30 seconds, breathing steadily. Slowly unwind on an inhale, then repeat on the opposite side.
-
4. Seated Cat-Cow Flow
Target: Articulates the entire spinal column, improving circulation to stagnant spinal ligaments.
-
How to Perform:
-
Cow Phase: Inhale deeply, open your chest forward, pull your shoulders down and back, and let your spine extend gently, gazing slightly upward.
-
Cat Phase: Exhale smoothly, press your hands against your knees, spread your shoulder blades apart, and tuck your chin toward your chest while gently curving your spine into a smooth "C" shape.
-
Move smoothly between the two positions for 6 to 8 slow breath cycles.
-
5. Seated Hamstring Extension with Hip Hinge
Target: Relieves hamstring tightness that pulls the pelvis into a permanent posterior pelvic tilt, flattening the lower back.
-
How to Perform:
-
Extend your right leg straight out in front of you, placing the right heel on the floor with your toes pointing up toward the ceiling. Keep your left leg bent at 90 degrees with the foot flat on the floor for stability.
-
Place your hands on your left thigh (not the extended knee).
-
Inhale, lengthen your torso, and hinge forward from your hip crease with a straight, neutral spine.
-
Stop as soon as you feel a smooth, firm stretch behind your right thigh and knee. Avoid rounding your shoulders or reaching for your toes.
-
Hold for 30 seconds. Switch legs and repeat on the left side.
-
6. Seated Side Body Lateral Reach (Quadratus Lumborum Stretch)
Target: Stretches the Quadratus Lumborum (QL) and latissimus dorsi, muscles that tighten from leaning to one side or resting on an armrest.
-
How to Perform:
-
Hold the edge of your chair's seat on the right side with your right hand for support.
-
Inhale and reach your left arm straight up toward the ceiling.
-
Exhale and gently lean your torso toward the right, reaching your left fingertips up and over in an arc.
-
Keep your left hip bone firmly planted down on the chair—do not allow it to lift off the seat cushion.
-
Feel the stretch expand along the entire left side of your waist and lower flank. Hold for 20 to 30 seconds, then repeat on the opposite side.
-
4 Desk Adjustments to Keep Pain from Returning
Performing stretches treats the symptoms, but modifying your workstation ergonomics removes the underlying cause of your lower back pain:
-
Check Your Hip-to-Knee Angle: Your hips should be positioned slightly higher than your knees (an angle of roughly 100° to 110°). If your knees sit higher than your hips, your pelvis tilts backward and strains the lumbar discs. Raise your chair height or sit on a small firm cushion.
-
Use Lumbar Support: If your office chair lacks adjustable lumbar support, roll up a small hand towel or use a dedicated lumbar roll placed in the small of your lower back to maintain your natural inward lordotic curve.
-
Keep Feet Flat: Dangling feet place heavy traction on the lumbar spine. If your chair needs to be high to meet your desk, use an ergonomic footrest or a sturdy box beneath your feet.
-
The 30-Minute Movement Cue: No sitting posture—no matter how ergonomic—is healthy when maintained continuously. Stand up, pace for 60 seconds, or perform seated pelvic tilts every 30 to 45 minutes to keep synovial fluid and blood circulating.
Medical Disclaimer: The exercises and advice provided in this guide are intended solely for educational and informational purposes and do not replace personalized medical care, physical therapy, or diagnosis. If your lower back pain radiates down your leg below the knee, is accompanied by numbness, pins-and-needles, muscle weakness, or causes loss of bowel or bladder control (red-flag signs of severe nerve root compression or cauda equina syndrome), do not perform these stretches; seek immediate medical attention. Always consult your physician or physical therapist before starting a new exercise regimen.



Comments
No comments yet. Be the first to ask a question or share an update.
Leave a comment
Your mobile number is never published. Comments appear after review. Website links, email addresses and code are not allowed.